Different features available for External Coordinators
For the latest information using the upgraded e-asTTle tool, visit e-asTTle - Overview and access on Tāhūrangi.
Finding students
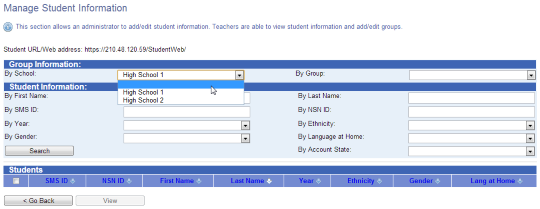
In addition to the filters that teachers can use, you can also filter by school. To find students across multiple schools, select the “blank” option from the "By School" drop-down.
Select using multiple filters. Searching by "School" only could create a long list, especially if it is a large school. Also, a School-only search could slow down e-asTTle, which could affect other users.
A blank SMS ID indicates that the student exists in multiple schools.
Managing groups
You can manage your groups much like a teacher can. That is, you can view, edit or delete the groups you created.
Managing group information – explains on the types of groups, how to create new groups, and what to do to view, change, or delete group inforamation.
Between Schools Groups
In addition to creating groups within a school, you can create “Between Schools” groups. This could be a "group of groups" or a combination of groups from different schools. Use the following steps to do this:
- Select "Manage Students" from left menu.
- Select "Add New Group".
- Enter information in "Group Name" and "Description" fields. Your description should be detailed.
- Choose the "Select Groups" radio button, then select "Continue".
- Select, from the "School" drop-down, the school you wish to include.
- In the "Group" box, select the group you wish to include. To select multiple groups, hold down the <CTRL> key as you select the groups.
- Select "Include".
- Repeat steps 5, 6, and 7 if you wish to include groups from multiple schools.
- When you have added all the groups you need, select "Save".
If you want to create a group that is made up of groups that you created, select the blank option from the "School" drop-down.
Creating Tests
You have the ability to create a collection of common tests to use across multiple schools. Schools that you have access to will be able to view the tests you created.
If the test was assigned across multiple schools, each school will only have access to their students’ results. Once permission is disabled, schools will no longer be able to see your tests or any reports for their students who sat tests that you created.
Guidelines for creating effective tests – advice for creating tests and for choosing curriculum levels for adaptive tests.
Viewing Tests
You can view your tests, tests created by teachers in schools you have access to, and those created by other External Coordinators who share a common school with you.
Your "View Existing Tests" screen has an extra checkbox labelled "My Tests", which will display only the tests you created.
In addition, there is an extra filter for "School". Select the school whose tests you wish to view or select “Other External Coordinator Tests”. After that, select "Search".
Finding and managing your tests – detailed information about finding your tests, viewing test details, and understanding key components.
Deleting Tests
You can only delete your test if the status is Pending or Accepted. Once your onscreen test has been sat or marks for your paper test have been entered, you will no longer be able to delete that test.
Assigning Tests
This process is the same as for teachers; however, you have a few extra options.
- My Tests check-box – selecting this option displays the tests that you have created.
- selecting a school from the drop-down will show all tests created in that school
- selecting “Other Ext. Coord. Tests” from the dropdown will show all tests created by other ECs who share access to at least one school with you.
When you assign a test to students from multiple schools, each school will only be able to see reports for their own students.
Creating test assignments – a step-by-step guide takes you through the process.
Making Student Exclusions
This process is the same as for teachers. When you assign a test to students across schools, teachers from those schools will be able to make and view student exclusions.
However, once a student is deleted from a school, teachers from that school will not be able to see the deleted student on the Student Exclusions screen.
You will still be able to view and carry out student exclusions for students that have been deleted.
Student exclusions – how to exclude students and view excluded students.
Marking Tests
This process is the same as for teachers.
- Marking an onscreen test – step-by-step guide for marking an onscreen test.
- Marking a paper test – process for marking a paper test.
Reports
The process to find reports is the same as for teachers. You will need to use extra search filters to help you find tests.
Extra filters:
- “Other Ext. Coord. Tests” – displays all "scored" tests created by other external coordinators where you have at least one school in common.
- Selecting a school – displays all "scored" tests created by teachers in the selected school.
- Selecting “My Tests” – displays all your "scored" tests.
- Selecting “My Tests” and “My Groups” – retrieves a list of all groups created by you who sat your tests.
When you select a group from the Group filter box and click "Search", this will return all scored tests sat by any student who is a member of the selected group.
View reports – general navigation - full information about searching for tests to report on and how to use filters.
Overnight Report Generation
This is the same as for teachers, but External Coordinators are more likely to be generating large reports.
Overnight report generation – what you need to know about accessing overnight reports and error status.
- Related information


