Marking an onscreen test
For the latest instructions using the upgraded e-asTTle tool, visit e-asTTle - Marking tests on Tāhūrangi.
Selecting a test
- Select "Mark Test" from the left menu.
- Select appropriate fields to search by using the "Test Information" drop-downs.
- Select "Search".
- Select your "Test Name" in the Test Table. You may need to scroll down to find it.
Hints
- Use CTRL + F to search for a keyword in your test name.
- You can find all tests in the school by clicking on the blank option for each filter drop-down.
- Tests can be sorted in ascending or descending order by clicking on the arrows next to the blue column titles. For example, selecting the "Test Name" column sorts tests in alphabetical order.
Selecting an assignment
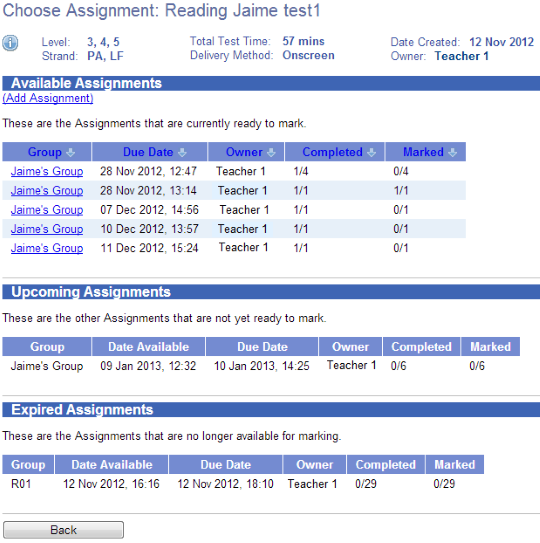
Once you select a test, the "Choose Assignment" screen displays. Select the relevant assignment group to begin marking.
Assignments are organized by their type:
- "Available Assignments" are those ready to be marked. This means the Due Date has passed, or all students have submitted their test.
- "Upcoming Assignments" are those not yet ready for marking, as the Date Available is in the future, or not all students have submitted their test.
- "Expired Assignments" are those no longer available for marking. Paper assignments never expire. Onscreen assignments expire when no students sat the test before the Due Date.
Entering Marks
Onscreen tests can only be marked when all assigned students have submitted the test, or when the Due Date has passed.
For onscreen tests, you will only need to mark the open-ended questions. Closed questions (e.g., multi-choice, matching etc.) will be marked automatically.
There are two features of onscreen marking designed to make it faster:
- Identical answers are grouped together so you only have to mark a given answer once. All students with the same response will automatically receive this mark.
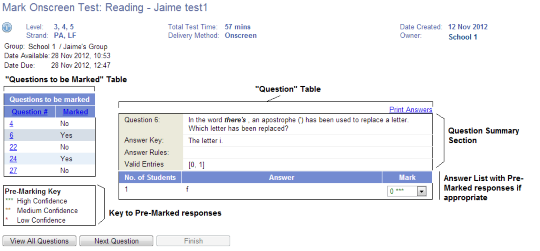
- Each time you mark a question, the answer and your mark is stored in a database and used to help ‘pre-mark’ future students. Once many marks have been collected for an answer, the "pre-mark" next to a question will be green and have a high confidence rating (***) next to it. When you see a green mark with the three asterisks, you can be confident in accepting the suggested mark.
See Pre-marking for more information.
The beginning of the question and the answer key will display on the screen. However, some teachers prefer to also print a copy of the test questions to assist with marking.
- Select the question number that you want to mark
- From the "Mark" drop-down, select the mark you wish to give the response. Use the Answer Key and Answer Rules displayed on the screen to assist you.
- Select "Next Question" to mark the next question. The "Marked" column for the previous question will change to “Yes”.
- When finished marking all questions, select "Finish".
- When students leave a question blank, a dash is pre-populated as the mark for that question.
- If the question had multiple parts answered in multiple boxes, responses display as bullet points.
Viewing a student’s multichoice answers
Sometimes you may wish to go through a test with a student, and see what answers they chose for multiple-choice questions.
Select the "View All Questions" button to see responses to the questions that were automatically marked.
- You may also like:


