Creating, reviewing and accepting a Custom or Adaptive test
For the latest instructions using the upgraded e-asTTle tool, visit e-asTTle - Creating and managing tests on Tāhūrangi.
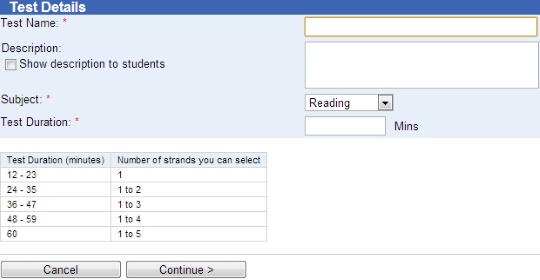
Test Details

- Select "Create New Test" from the left menu.
- Select "Create Customised Test" or "Create Adaptive Test".
- Enter a "Test Name" of up to 20 characters.
- Be specific. Naming conventions make it much easier to find the test later. Students will see this name when they sit the test.
- If you would like, enter a "Description".
- This is helpful in telling tests apart which may be useful for other teachers in your school. Tick the check-box if students should see the description.
- Use the drop-down to select the "Subject".
- Enter a number into "Test Duration".
- This is the time available for sitting test questions. Check the table on the screen to see the test durations available for your test type, and how the duration you choose affects the number of curriculum areas you may include in the test.
- Select "Continue".
Curriculum Levels

- Drag the blue slider to show how much of that curriculum level you would like in the test. (For Adaptive tests you can select Yes/No only).
- You can select up to three adjacent levels. It is a good idea to always move at least one slider to “Most”.
- For guidance on level selections, see Guidelines on creating a good test.
- Select "Continue".
Curriculum Strands

Read the message on the screen carefully. It tells you how many strands you can choose, based on your subject and test duration.
Drag the blue slider to show how much of each curriculum strand you would like in the test. Remember to always move one slider to Most!
Select "Continue".
Curriculum strands aggregate together achievement objectives derived from the 2007 Curriculum documents.
Attitude and Delivery
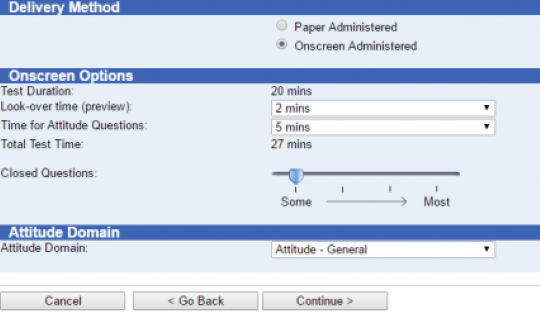
Custom tests only - Select a radio button to choose how your test will be administered.

Choose carefully. Some questions such as drawing questions only come up in paper tests. This means if you change the delivery method while reviewing the test, your test be re-created from scratch and have a new set of questions.
Your delivery method cannot be changed once your test has been accepted.
Onscreen
If you have chosen "Onscreen", you must use the drop-downs to choose:
- "Look-over time (preview)" – maximum time students may pre-read the test without answering.
- "Time for Attitude Questions" – maximum time students may spend answering attitude questions.
- The screen will add up the "Total Test Time".
When booking computer labs, allow extra time on top of this for logging in, resetting lost passwords and going through the practice questions.
Close Questions
Drag the blue slider to indicate your preferred proportion of Closed Questions.
- Closed questions have a fixed correct answer, for example, by using multi-choice. They can be computer marked.
Attitude Domains
Use the drop-down to select from the available "Attitude Domains".
See "Attitude Question Details" to see the question lists and decide which are most appropriate for your student's age and reading level.
Currently, only the general attitude set is available for Māori Medium subjects.
Select "Continue".
Review and Create Test
- Check through the summary of choices you made for the test.
- If needed, go back and adjust settings by selecting the link next to the step number.
- Stay on the page and wait for the "Test Ready" link.
- Navigate away to other e-asTTle screens or elsewhere. Look for your test on the "View Existing Test" screen later.
Evaluate and Accept Test
Once your test is created, it will say "Pending" next to the test name. You need to view the test and use your professional judgement to evaluate the test summary and test questions.
If no further changes are required, select the "Accept" button. After your test has been accepted, it will become available for you to assign.
Test creation is not a perfect process. e-asTTle test creation balances many complicated factors – such as your choices, reading times, the mix of deep and surface questions. This means it sometimes returns questions in strands or levels you did not specify.
Always check the actual numbers of questions returned in each category, and gauge if the test is sufficiently close to what you asked for.
Reviewing the test
What to look at first
Before you look at the test questions, look at Section 2 ("Curriculum Level") and Section 3 ("Curriculum Strands"). Compare "Selected" with the "Actual" numbers.
- Are there questions in every sub-level (B=Basic, P=Proficient, A=Advanced) within the levels you asked for?
- Are there enough questions in your selected strands? 6 or more is a good guideline.
If the test is too different from what you asked for, select "Edit Test Settings". This will guide you through test creation a second time. You have several options:
- Navigate through and select the "Create test" button again – without changing any settings. You may get a test with fewer gaps on the second attempt.
- Select the "Test Details" button and increase the test duration. Longer tests give e-asTTle more flexibility – for example, it can include longer Reading passages.
- Edit some of your strands – if the created test continues to be very different from your specifications, it may be necessary to compromise and edit some of your strand selections.
Test Summary is OK
Once the test summary is OK, select "View Test". This will bring up the test either as a PDF or an Onscreen Test player.
Test not coming up
Are your pop-ups enabled?
Look at the questions. Overall, does the test look at the right difficulty?
Sometimes, your test might contain a few questions that are not quite right. For example, there could be text that is not age-appropriate or questions where the concept has not been taught yet.
You can replace these using the "Replace Questions" function. You can swap up to 20% of questions in a Maths test, one passage and its questions for a short Reading test, or two passages and associated questions for a test over 30 minutes long.
If the test questions are OK, close the test and then select "Accept Test".
Otherwise, select "Edit Test Settings" and change some of your selections. Then, create the test again and re-evaluate.
- Related information

