Add Numeracy Project results
Using e-asTTle, you can enter stages and generate basic reports for the following Numeracy Project assessments.
- NumPA
- GloSS
- IKAN
Accessing the Numeracy Project
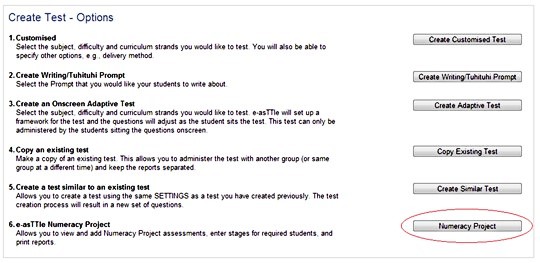
Access the Numeracy Project by selecting "Create Test" from the left menu and then selecting "Numeracy Project".
Numeracy is a completely separate area in e-asTTle. You cannot view numeracy tests through "View Existing Tests". Likewise, you cannot view numeracy reports through "View Reports".
Text version of image Create Test - Options
The first screen you will see is "View Existing Numeracy Tests".
All numeracy tests that have been added can be accessed from this screen. It is also where you can delete tests, access the test to enter stages, and view reports.
Finding an existing numeracy test
Use the filters and select "Search" to bring up an existing Numeracy test.
Steps for Adding (Assigning) a new Numeracy test
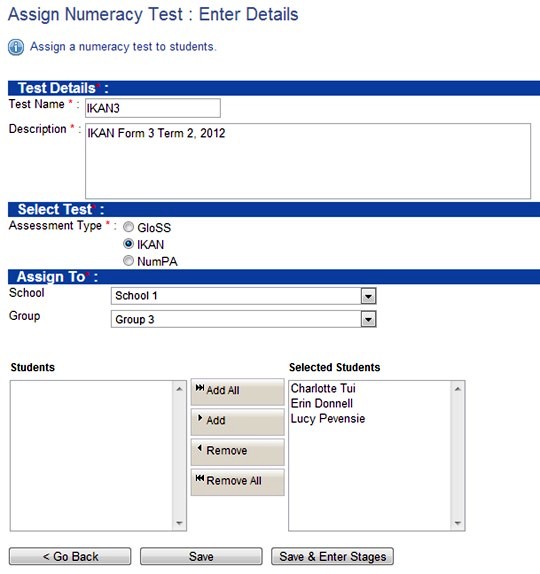
First select "Add Test". Then, give your test:
- a name (For example, name your IKAN test with the IKAN version.)
- a description. (You may want to include information on the student group who took the test.)
Next, select the Assessment Type – whether your test is a GloSS, IKAN or NumPA.
Then, use the drop-down to select the Group who took/will take the assessment. Select the relevant students.
- To select all students select "Add All".
- Otherwise, select individual students from the group by either double-clicking the preferred student or students one by one. You could also do this by holding down the CTRL key as you select each student.
Once all students you want to include are highlighted in grey, select "Add".
Finally, select either one of these:
- "Save" to create your assessment and enter marks later
- "Save & Enter Stages" to go directly to the marking screen.

Entering Stages for a Numeracy test
From the "View Existing Numeracy Tests" screen, tick a check-box next to your test name, then Select "Enter Stages"’.
The steps from here are similar to those in normal e-asTTle marking.
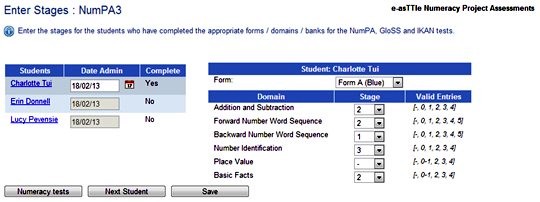
- Click on the student you wish to mark from the Group table (left-hand side).
- Ensure the correct "Date Administered" displays, to make sure reports display correctly.
- Enter the appropriate stages in the Response table (right-hand side).
The "Valid Entries" column shows you what values are accepted for the domain.
The NumPA diagnostic interview starts with a set of preliminary questions (white form) to determine whether to use form A, B, or C for each student’s assessment.
For NumPA, you need to select the form from the dropdown box in order for the correct domains for that form to become available.
All domains need to be completed before the student is reported on. If a student fails to attain a stage for a given domain, enter a dash (-).
Next steps
After you have entered a student’s marks, select either one of these:
- "Next Student" to enter the responses for each student in the table
- the student you wish to mark next.
Complete the table for all students.
Notice that as you save the completed responses for each student, the "Complete" column changes from "No" to "Yes".
When you have finished marking, select "Save" to save all entries.
To return back to the main screen, select "Numeracy tests".
- Related information


